This step-by-step guide will help you create a Press-Ready TEXT PDF file for your book.
Please note, the user interface of software often changes, and the attached screenshots or information may not match exactly to your software of choice. However, the general information provided will be of assistance as you navigate through your own software of choice.
Preliminary Thoughts and Considerations
One of the things you’ll first want to do is declare whether your book will be hardcover, softcover, or plastic coil, as these three types of books have slightly different requirements for the TEXT PDF that will be used when printing.
Once you’ve confirmed which binding style you want to have produced, you can then determine the trim size of the book. For example, 8.5''x11'', 6''x9'' or 10''x10''.
After you’ve determined the size, you can progress to Step 1 in the process of creating your press-ready TEXT PDF.
Step 1 - Page Set-Up
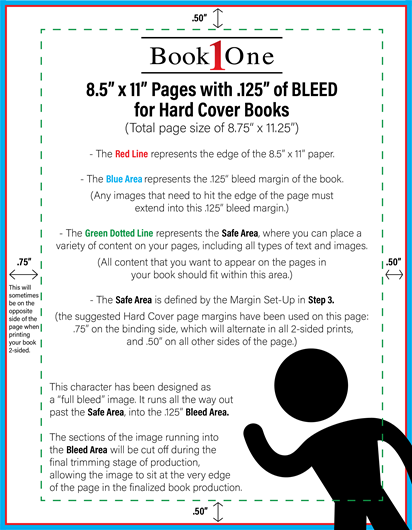
To begin, you’ll want to create a new file at the exact page size you’re looking to print. For example, if you want your book to be 8.5'' x 11'', you will set your page size at 8.5'' x 11''.
UNLESS:
Your book will have a background color, pattern, or image that covers the entirety of the page.
Your book will include any full bleed images, or images that reach the end of the pages in the finalized book. (See the Page Set-Up Diagrams below for reference)
If either or both of these things apply to the design you plan to have for your book, you will need to include .125” BLEED on all four sides of every page in your book. Essentially, you will want to set the overall page size for an 8.5'' x 11'' book with BLEED, to 8.75'' x 11.25'', or for a 6'' x 9'' book with BLEED, 6.25” x 9.25”.
Occasionally some programs like Adobe InDesign will allow you to enter a full-page size, then add your measurement of bleed afterward
Bleed is an additional .125” margin on all four sides of every page in the book that will eventually be trimmed off during production. This ensures images and background elements stop exactly at the end of the page in the finished book. This .125” bleed around the entire page should not include any important information that you want to be visible in the book, and should only contain background elements or images which are intended to reach the end of the page, these images and background elements will need to extend into the .125” bleed.
If bleed is not added, you may see white lines along the ends of some pages in your book, which comes from the surrounding white paper that your TEXT PDF is printed on. A process called undersizing can alleviate this problem, however, this process will shrink the overall size of your book’s pages or the size of the book entirely.
Bleed is not necessary for books which have no background elements or images that reach the edges of any pages. If you book has white space around the bodies of text or images on every page, you may omit bleed from your file and create your TEXT PDF at the exact size you want your book.
Step 2 - Margin Set-Up
Once you’ve chosen your binding style (hardcover, softcover, or plastic coil), and created a new document at the correct size, either with bleed or without it, you will need to set up margins for your text and images to sit within, so all information is clearly represented on each page in your book.
We suggest different margin sizes for each type of book, to ensure a centered and consistent look in the finished product. These margins are listed below:
Hard Cover
.75” (or 1/8”) Margin on the Binding Side of page
.5” (or 1/2”) Margin on other 3 sides of page
Soft Cover & Plastic Coil Books
.5” (or 1/2) Margin on the Binding Side of page
.25” (or 1/4”) Margin on other 3 sides of page
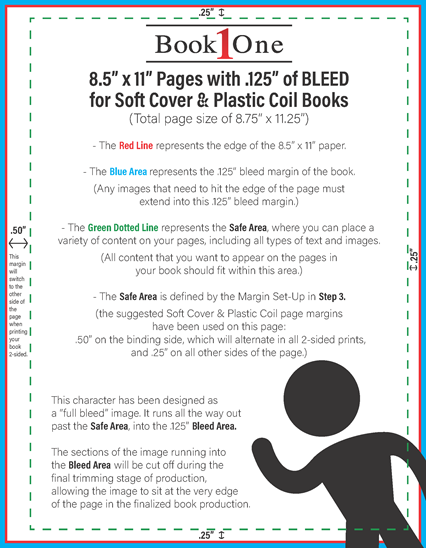
If you are having your book printed DUPLEX [2-Sided], your binding side will alternate from left to right on each page.
If you are having your book printed SIMPLEX [1-Sided], your binding side will stay the same on every page.
Step 3 - Pagination Set-Up
With your margin setup completed, you can now progress into the stage of pagination, which will involve you organizing which side the pages are printed on in the finalized book.
PLEASE BE AWARE: The first page in your TEXT PDF file, will ALWAYS be the first printed RIGHT-HAND PAGE.
Pagination can affect your total page count, as additional blank pages can be added throughout your book to ensure proper pagination for certain pages.
Once your pages have been set up, you can begin typing, and inserting pages as you please for the design of your book. Please keep all factors discussed above in mind, as these principles can be expanded upon to further the design of your book.
Step 4 - Saving Your File
Here at Book1One, the only file type we use to produce books with are PDF files. When you’re placing your order, any files you submit in both the COVER and TEXT sections of the ordering process must be in a PDF file format.
Book1One will review your TEXT file(s) when you place your order. However, it is important to get your files as close to press-ready before submitting them in the ordering system, so as to not delay your production schedule. When saving your completed TEXT file, you’ll want to ensure that you save your file as a Press-Ready PDF file.
Generally, across all computer programs you can design your book in (including online platforms), you will be able to save your book design in the format of a PDF file. However, a press-ready PDF file is a PDF file with specific attributes which ensure your files move to press without errors.
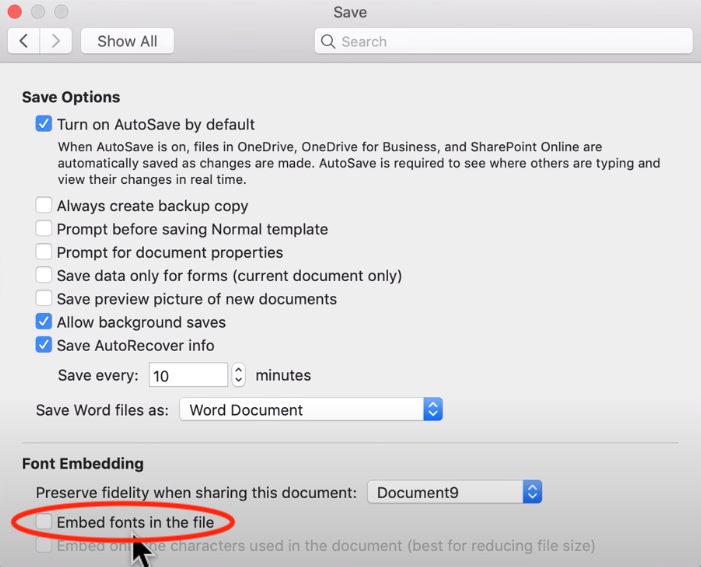
The most important of these attributes is font embedding, which is a process of saving a version of the font from your computer inside the PDF file. All PDFs do not support font embedding, and your program of choice for designing your book may not have its option for font embedding in all PDFs active.
Microsoft Word for instance requires you to turn it on, and can be found under File -> Word Preferences/Options -> Save -> Check the “Embed Fonts in the file” box. Be sure to uncheck any boxes that refer to only embedding certain fonts, or not embedding system fonts.
Your fonts can also be embedded in a variety of different ways depending on the file type you save your PDF as. Sometimes to select a different type of PDF, you’ll need to Export your file, rather than Save your file. The export option can generally be found under the File Menu item in most computer programs.
Common PDF types that support font embedding include: PDF/A, PDF/X. Selecting these file types should automatically embed the fonts from your design into the Press-Ready PDF file that is created.
If your design program does not seem to have any options for font embedding when saving your PDF file, you can still re-save a PDF to embed all fonts.
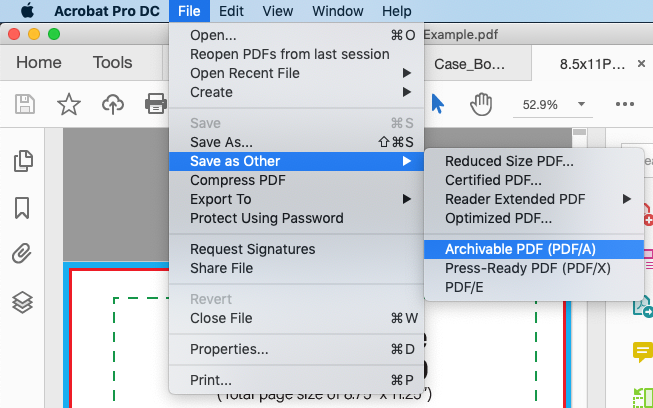
By saving your book as a PDF file, then using Adobe Acrobat to re-save your PDF file again as an Archivable PDF/A, you can achieve the same effect of having all of your fonts embedded in the resulting PDF/A file that Adobe Acrobat would create.
The option to re-save a PDF/A in Adobe Acrobat, will be located under File -> Save As Other -> Archivable PDF (PDF/A).
With these steps completed, you are all set to submit your Press Ready TEXT file to us when using placing an order!
As always, if you have any questions, do not hesitate to contact us for further assistance from our helpful customer service staff!